

Nail Art ~ How To Use Your Nail Shell Sheets
Let’s talk nail art and how to use these beautiful shell paterns onto the nails.
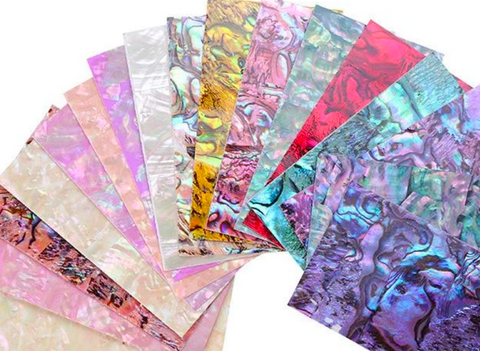
The nail art shell sheets have a sticky back and are coming in many pearly colours and shell random paterns. It’s a shell layer, that the nail artist will use by breaking littles pieces or also by cutting shapes and placing them onto the nails.
As the shell material is quite stiff and not pliable nor flexible, these littles gems will need to be strongly encapsulated into the nail products ; for this to work, the best products to use to get the strongest hold onto the nails will be by encapsulating the pieces into Acrylic products.
Or you might also want to experiment with some other nail systems eg. hard gels or wrap but they need to have a strong hold onto these shell pieces… maybe it’ll work! Why not having a go & try!
Because the shell sheets are of a hard material and as said earlier they have no flexibility, you cannot bend them too much or they’ll crack, but this is fine too! To maintain these little hard pieces of shells onto the nails, you will need solid and strong layers of Acrylics to encapsulate them, this will make a strong and resistant structure too to keep them longer.
In other words these shell art pieces won’t last if you are applying them straight onto a flexible surface, meaning it won’t work that great or for long if you are trying these on natural nails, or on just Gel Polishes only ; there will be too much flexibility and not enough of a strong structure to keep this kind of nail art pieces. Applying them with just Gel Polishes might be too flexible too.
📌 The recommended system to be used with these little pearly shell pieces is Acrylic, for the strongest and longest hold and wear of these beautiful shell art pieces onto the nails. This is a very popular nail art medium for the nail artist to do and the results for the clients are so beautiful and unique every time and with every background colours or glitters.
Very popular shell pearly nail art shapes encapsulated into a strong hard Acrylic structure.
HOW TO USE THE NAIL SHELL SHEETS
After a good nail preparation done onto the nails.
Apply some acrylic in a quite thin layer to start with, as you will need to encapsulate and lay the pieces of shells later, so best to keep this layer thin. Let this set up and dry hard.
Cut a small section of the shell paper. You will see that is has a paper backing which is made sticky. Take a regular pair of scissors and cut off some small shards down.
The hardest thing about using these shell sheets is getting the backing off the back😜.
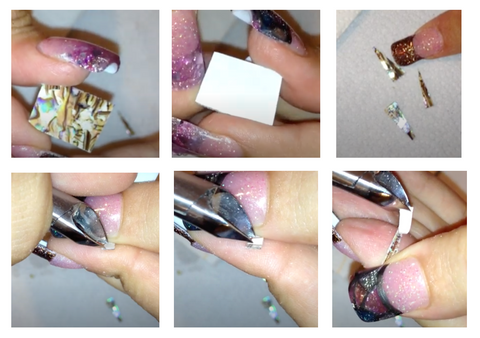
By trying to push some cuticle nippers in between the paper and the back of it, just grab the paper film with the nippers to peel it off. You will feel the stickiness of this shell piece into your fingers ; this sticky back will help with the placement of the pieces.
Lay one piece of Shell on the nail where you want it. You’re not going to be able to get this completely flat on the nail at first and it’s normal! It does take some manipulation…
this definitely isn’t one of the easiest nail art medium to use and it does take patience and a bit of time manipulating the pieces to get them exactly where & how you want.
The stickiness on the back of the shell pieces helps because it’s easier to keep them in place.
When the pieces are placed, you will see how it’s kind of sticking up, press it down on the middle as best as you can and start by laying a bead of Acrylic to set it right there and letting it set up so that way it holds the middle down.
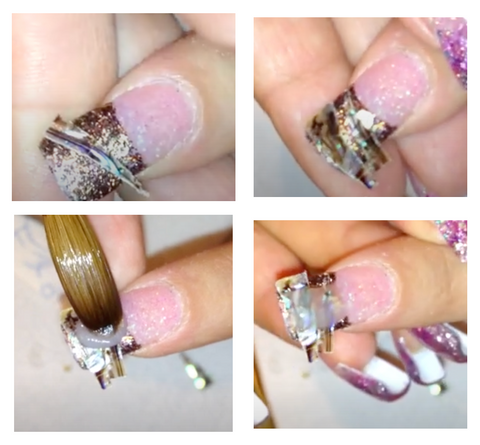
Let that bead of Acrylic to set up and harden up. When you can hear a click by tapping onto your Acrylic with a metallic tool, meaning your Acrylic has hardened up, you will see that the sides of the shell pieces are still sticking out. If you are trying to press on them they’re going to crack a little bit so gently try to bend them just a little bit and start encapsulating the sides and the whole nail.
📍Remember the shell pieces are not an easy nail art medium and you just want to take your time working with them. After encapsulating all your pieces in your Acrylic nail, let it fully set up.
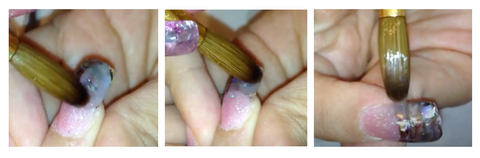
You know when the Acrylic is hardened by this special click when tapping on it with a metallic tool.
Start shaping it by filling to make this shape right and the surface of the nails smooth.
Dust off and clean the nails. Use your favorite Topcoat and cap everything in place.
💡Tip: Topcoats that are curable into a nail lamp are best to use on artificial enhancements, they are giving more longevity for the nails and a better protection of the art done on the nails. The curable Topcoats are more acting as sealants as well so they will keep your work intact till the next service. For Acrylic nails the super glossy shine of NSI GLAZE'N GO Topcoat Sealant for Enhancements is recommended, you will love its glossy classy shine and it's tack free!
Re-hydrate the cuticle and surrounding skin with cuticle oil.
Et Voila, magnifique!